Easter is over for another year..........always a lovely time of year and I hope you had a brilliant long weekend filled with lots of yummy chocs!
A little while ago, I posted about making your own laundry liquid. A week or so ago, I had ran out of my usual box of eco laundry powder.....actually I was eagerly awaiting the finish of it, as I wanted to return to making my own homemade laundry liquid. It has been too long since I made a batch, so I took myself off to the supermarket for a couple of ingredients I was getting low on.
And I have made a tutorial with some of my step-by-step photos....just for you!! I hope it makes sense.....ok here goes!
Homemade Laundry Liquid
(This recipe makes 5 litres)
Ingredients:
750 mls of water
5 Litres of hot water
1/2 cup of Lux soap flakes
1/4 cup of Lectric washing soda flakes (not crystals)
1/4 cup of borax
Equipment:
Large saucepan
Measuring cup/jug
Wooden spoon or paint stirrer
10 litre plastic bucket
Method:
Measure the 750mls of water and empty into saucepan. Add the Lux flakes to the water. Over a medium heat, stir the soap until dissolved completely and the mixture is clear. Ensure the soap is dissolved, to prevent the mixture separating once cooled. Now add the washing soda and borax to soap mixture. Stir until thickened and then remove from heat. The mixture will resemble thick milky glue.
Add 5 litres of hot tap water to the 10 litre plastic bucket. Now pour your thickened mixture from the saucepan into the hot water.
Stir well to combine the water and soap mixture.
As the mixture cools, it will thicken. I like to give it a stir every 10 or 15 minutes, to ensure a smooth combined liquid. Once the mixture is completely cool, you can add your essential oil for fragrance. I used pure Lemongrass essential oil, which gives a great fresh aroma. Lavender oil is another favourite of mine.
For storage, I poured most of mine into a 5 litre water storage container (with a wide opening for easy pouring). The rest of it I poured into a recycled coffee jar and added some jute twine for decoration. Give the plastic container a good shake to mix liquid, before topping up your jar. I use 1/4 cup of this laundry liquid per load in my front loader.
N.B. As this recipe contains Borax, it may not be suitable for Grey Water use on gardens.
I have been using this for a over a week now and it is really doing a great job. For only 2 or 3 dollars, it makes just over 5 litres of laundry liquid which will last ages! Plus there are no nasty chemical fillers like commercial laundry detergent. I hope my tutorial has inspired you to make your own batch. I would love to hear how it turned out!!
Cheers,
Jodie
MPH xx
Showing posts with label Make it. Show all posts
Thursday, 12 April 2012
Friday, 10 February 2012
All you need is love.......
That day is just around the corner......yes, Valentine's Day! Whether you celebrate it or not, it is nice to know that for some, it is a special day. It always brings back memories of a young me........at high school, hoping for a romantic anonymous card, slipped into my locker or letterbox. Alas, the locker Valentines card never materialised......but I do remember getting a card in my letterbox once.....many years after the nervous high school time......not from some mysterious stranger, but from my boyfriend at the time. Very sweet!
These days, when I mention Valentines Day, my partner looks at me in horror and mumbles some unintelligible comment and then strides off, as fast as his legs will carry him. The actual day comes and goes in my household, like any other day. If he happens to be down on the Peninsula, I could perhaps hope for a nice dinner? But usually he is up in the city and gets off the hook nicely! Don't get me wrong, my "has an answer for everything" other half, can be quite romantic and even chivalrous, but only when he plans to, not because of a day on the calendar. So I patiently wait........for his next plan, lol.
Now, if you are one of those hopeless romantics or you just want some love trinkets to display around your house......I have the handmade solution for you!!
Valentines Love Message Hearts tutorial:
From the very talented Kim Archer at Etzcetera Magazine. She has created these very cute hearts, with embroidered messages on them. Link for tutorial: Valentines Love Message Hearts
Valentines Love Blocks Tutorial:
And if you have a hubby or partner who can whip you up some timber blocks ready to decorate (or you can get timber cut to size at your local supplier, such as Bunnings). I found this groovy Valentine Love Blocks tutorial from the talented family over at Six Sisters Stuff. These blocks are so easy to make and the huge choice of beautiful scrapbooking papers to use is amazing. I can see some made in neutral colours, looking right at home in my front lounge room! In case you are wondering where you can get Mod Podge, I happened to spot some the other day in Spotlight, or most craft stores would stock it.
Link for tutorial: Valentines Love Blocks
Weekend markets:
Don't forget to pop into some local markets this weekend if you have the time.......
Saturday: Rosebud Primary School market
Sunday: Mornington Racecourse market
Have a brilliant weekend.....and don't forget your umbrella, some rain has been forecast!
Cheers,
Jodie
MPH xx
These days, when I mention Valentines Day, my partner looks at me in horror and mumbles some unintelligible comment and then strides off, as fast as his legs will carry him. The actual day comes and goes in my household, like any other day. If he happens to be down on the Peninsula, I could perhaps hope for a nice dinner? But usually he is up in the city and gets off the hook nicely! Don't get me wrong, my "has an answer for everything" other half, can be quite romantic and even chivalrous, but only when he plans to, not because of a day on the calendar. So I patiently wait........for his next plan, lol.
Now, if you are one of those hopeless romantics or you just want some love trinkets to display around your house......I have the handmade solution for you!!
Valentines Love Message Hearts tutorial:
From the very talented Kim Archer at Etzcetera Magazine. She has created these very cute hearts, with embroidered messages on them. Link for tutorial: Valentines Love Message Hearts
Valentines Love Blocks Tutorial:
And if you have a hubby or partner who can whip you up some timber blocks ready to decorate (or you can get timber cut to size at your local supplier, such as Bunnings). I found this groovy Valentine Love Blocks tutorial from the talented family over at Six Sisters Stuff. These blocks are so easy to make and the huge choice of beautiful scrapbooking papers to use is amazing. I can see some made in neutral colours, looking right at home in my front lounge room! In case you are wondering where you can get Mod Podge, I happened to spot some the other day in Spotlight, or most craft stores would stock it.
Link for tutorial: Valentines Love Blocks
Weekend markets:
Don't forget to pop into some local markets this weekend if you have the time.......
Saturday: Rosebud Primary School market
Sunday: Mornington Racecourse market
Have a brilliant weekend.....and don't forget your umbrella, some rain has been forecast!
Cheers,
Jodie
MPH xx
Thursday, 9 February 2012
Handmade in the laundry!
I don't know about you, but I can walk down the laundry powder aisle in my local supermarket and just get bogged down with the endless variety of products. I mean really, how many types of washing powder do we need? And don't get me started on the prices! Personally, I try to buy the most eco-friendly and natural product I can find, hopefully at a reasonable price. Unfortunately, the powders that claim to be (and hopefully are) eco-friendly are generally the higher priced products. So, what to do? Well, I am glad you asked......
Make your own!! Yes, you can. Plus, it works........yippee! OK lets go......
I have made both dry and liquid laundry detergents and I like both. Obviously the powder form is a lot easier to store, just pop it into a nice jar or container in your laundry and that's that. The liquid form requires storage in plastic containers, that you can shake from time to time. Recycled 2 litre plastic bottles are ideal for this and you can store them in your laundry cupboard.
Ok, how do you do this and where do the ingredients come from?
First of all, the ingredients are available at your local supermarket. If you want to make the mixture smell deliciously nice, add some pure essential oils from your own stash or head down to the health food store to stock up. I love lavender and bergamot.......sounds like a weird combination but it smells divine! I also use water soluable lavender in my rinse cycle of my front loader.......it beats using store bought softener with artificial fragrance.
Liquid Laundry Detergent recipe:
1 cup of soap (Lux flakes)
1/2 cup of washing soda (powder, not the crystal form!) see pic below
1/2 cup of Borax (usually found in the cleaning aisle of supermarket)
Instructions:
In a large saucepan, mix all the dry ingredients into 1 1/2 litres of water.
Heat the mixture gently and stir until ingredients are completely dissolved.
Remove from heat.
In a large container (I used a 9 litre bucket), add 8 litres of cold water.
Then add the soapy liquid from the saucepan to the cold water and mix.
(I use a plastic paint stirrer from Bunnings or you can use a large spoon)
The mixture will gradually thicken when it cools and turn into a liquid gel.
Keep stirring for a while after it thickens for a better consistency.
Before you bottle it, add some essential oils for fragrance if you like.
The mixture will thicken more, so don't make the mistake I did and buy a container with a tap!
Use bottles with a good size opening and you will need to give the mixture a good shake from time to time.
Use 1/4 cup to each load of washing.
COST: Approximately $2.00 AUD for 10 litres! And it lasts for ages!
Laundry Powder recipe:
4 cups of grated laundry soap or flakes
2 cups of borax
2 cups of washing soda powder
Mix these all together and put into a container.
Use 2 tablespoons per wash.
Suitable for front and top loaders.
I usually sprinkle some essential oil in too and give it a good mix around in the powder.
This recipe is not as economical as the liquid form, but at least the ingredients are known, unlike commercial brands which are full of fillers and other nasties!
I hope you give one of these a try.....
My tip: If you hate supermarket shopping, go for the liquid version. It lasts such a long time!!
Make your own!! Yes, you can. Plus, it works........yippee! OK lets go......
I have made both dry and liquid laundry detergents and I like both. Obviously the powder form is a lot easier to store, just pop it into a nice jar or container in your laundry and that's that. The liquid form requires storage in plastic containers, that you can shake from time to time. Recycled 2 litre plastic bottles are ideal for this and you can store them in your laundry cupboard.
Ok, how do you do this and where do the ingredients come from?
First of all, the ingredients are available at your local supermarket. If you want to make the mixture smell deliciously nice, add some pure essential oils from your own stash or head down to the health food store to stock up. I love lavender and bergamot.......sounds like a weird combination but it smells divine! I also use water soluable lavender in my rinse cycle of my front loader.......it beats using store bought softener with artificial fragrance.
Liquid Laundry Detergent recipe:
1 cup of soap (Lux flakes)
1/2 cup of washing soda (powder, not the crystal form!) see pic below
1/2 cup of Borax (usually found in the cleaning aisle of supermarket)
Instructions:
In a large saucepan, mix all the dry ingredients into 1 1/2 litres of water.
Heat the mixture gently and stir until ingredients are completely dissolved.
Remove from heat.
In a large container (I used a 9 litre bucket), add 8 litres of cold water.
Then add the soapy liquid from the saucepan to the cold water and mix.
(I use a plastic paint stirrer from Bunnings or you can use a large spoon)
The mixture will gradually thicken when it cools and turn into a liquid gel.
Keep stirring for a while after it thickens for a better consistency.
Before you bottle it, add some essential oils for fragrance if you like.
The mixture will thicken more, so don't make the mistake I did and buy a container with a tap!
Use bottles with a good size opening and you will need to give the mixture a good shake from time to time.
Use 1/4 cup to each load of washing.
COST: Approximately $2.00 AUD for 10 litres! And it lasts for ages!
Laundry Powder recipe:
4 cups of grated laundry soap or flakes
2 cups of borax
2 cups of washing soda powder
Mix these all together and put into a container.
Use 2 tablespoons per wash.
Suitable for front and top loaders.
I usually sprinkle some essential oil in too and give it a good mix around in the powder.
This recipe is not as economical as the liquid form, but at least the ingredients are known, unlike commercial brands which are full of fillers and other nasties!
I hope you give one of these a try.....
My tip: If you hate supermarket shopping, go for the liquid version. It lasts such a long time!!
Thursday, 2 February 2012
Handmade last night.......
I had a few ladies over last night for a class, learning some more about the Bigshot machine. What is this you may ask? It is a die cutting and embossing machine, that is the back bone of my stash of paper crafting equipment. I love this thing!! It is nicknamed my "Biggie" and it churns out some gorgeous paper effects and shapes.
So, what can you make with it?? The list is endless......obviously you can emboss patterns into paper and it also cuts out shapes using die cuts (templates that cut shapes). Boxes, envelopes, shapes, letters, numbers, it has die cuts for many different uses available. And gorgeous embossing effects too. The materials to use with the die cuts are amazing......over 50 different types. Metal, fabric, paper, cork, felt, card.....so many!!!
What did we make last night? I showed the ladies some different uses for the assorted Bigshot dies and embossing folders.......something other than card making and scrapbooking applications. OK, we did make one card, but slightly different than a regular greeting card.
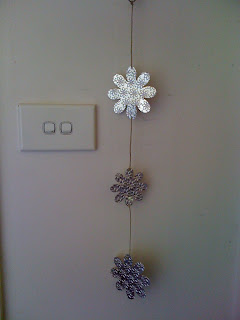
First of all, we used the Bigshot to emboss some flower shapes I had pre cut, using metal flashing. You can see them in the picture below. I then drilled holes in the flowers, ready for the girls to attach the string too, to make a wall mobile.
The girls had emailed me a favourite saying, which I then printed out, omitting some words. We then used the Bigshot to cut out letters in patterned paper and adhered them onto the poster, in the spaces left blank. See sample below:
And for the last project, we made a gift voucher card........so much nicer than those daggy ones from Coles Myer or such. This is a greeting card and card holder all in one.......
The ladies all had a good time.....and I am loving the new craft class space I have and feeling rather spoilt to have it.
Cheers,
Jodie
MPH xx
So, what can you make with it?? The list is endless......obviously you can emboss patterns into paper and it also cuts out shapes using die cuts (templates that cut shapes). Boxes, envelopes, shapes, letters, numbers, it has die cuts for many different uses available. And gorgeous embossing effects too. The materials to use with the die cuts are amazing......over 50 different types. Metal, fabric, paper, cork, felt, card.....so many!!!
What did we make last night? I showed the ladies some different uses for the assorted Bigshot dies and embossing folders.......something other than card making and scrapbooking applications. OK, we did make one card, but slightly different than a regular greeting card.
First of all, we used the Bigshot to emboss some flower shapes I had pre cut, using metal flashing. You can see them in the picture below. I then drilled holes in the flowers, ready for the girls to attach the string too, to make a wall mobile.
The girls had emailed me a favourite saying, which I then printed out, omitting some words. We then used the Bigshot to cut out letters in patterned paper and adhered them onto the poster, in the spaces left blank. See sample below:
And for the last project, we made a gift voucher card........so much nicer than those daggy ones from Coles Myer or such. This is a greeting card and card holder all in one.......
The ladies all had a good time.....and I am loving the new craft class space I have and feeling rather spoilt to have it.
Cheers,
Jodie
MPH xx
Thursday, 15 December 2011
Christmas Wreath tutorial by Designery
Hi all,
I hope you are having a great day! Yesterday, I thought I would do a tutorial of my very own, just for you, with love from my Designery xx
This wreath looks great and is really simple to make. I have been meaning to do something with a roll of hessian webbing I have been hoarding and now I have a snazzy new wreath for my front door!! I absolutely love natural colours mixed with red, so this is very much me!
Ok, now for the instructions........and I hope they make sense!
Materials and tools needed:
2. Once the glue has set (wait a few minutes for it do do so), you can start wrapping your wreath with the webbing. Wrap on angle. I used a 2cm overlap on each wrap of the webbing. Make sure you wrap quite tightly, or you will end up with lumpy bits on wreath.
3. Continue wrapping the wreath until you have double wrapped it. (I tried a single layer of wrapping, but it looked a bit thin). Snip off the remaining webbing. Using the glue gun, glue the end of the webbing at the rear of wreath.
4. Making the ribbon.
As I am completely hopeless at tying ribbons, I used a bit of a cheats way of getting a nice finish. I took a length of the leftover webbing and made two loops on the left hand side, the back loop slightly bigger than the front one. Now do the same on the other side, using the remaining webbing. Take the leftover end of webbing and wrap around the wreath and centre of your "bow", until it is secure enough to glue at rear of wreath behind the bow.
5. At the rear of the wreath (as pictured below), take a piece of linen ribbon and hot glue both ends to the back of the wreath. Wait a few minutes for glue to dry.
Your wreath is now ready to hang!
I hope you liked my first tutorial? I very much enjoyed making the wreath and LOVED how the end result looks. Handmade and beautiful!!
Cheers,
Jodie
MPH xx
I hope you are having a great day! Yesterday, I thought I would do a tutorial of my very own, just for you, with love from my Designery xx
This wreath looks great and is really simple to make. I have been meaning to do something with a roll of hessian webbing I have been hoarding and now I have a snazzy new wreath for my front door!! I absolutely love natural colours mixed with red, so this is very much me!
Ok, now for the instructions........and I hope they make sense!
Materials and tools needed:
- Cane wreath, approx 25cm in diameter (I found mine in an op shop and recycled it for this project)
- Hessian webbing (approx 5 metres)
- Hot glue gun
- Linen ribbon (30-40cm)
- Scissors
Instructions:
1. Using your hot glue gun, glue an end of your webbing at an angle, on to cane wreath. (Take care not to burn yourself with the hot glue!)
2. Once the glue has set (wait a few minutes for it do do so), you can start wrapping your wreath with the webbing. Wrap on angle. I used a 2cm overlap on each wrap of the webbing. Make sure you wrap quite tightly, or you will end up with lumpy bits on wreath.
3. Continue wrapping the wreath until you have double wrapped it. (I tried a single layer of wrapping, but it looked a bit thin). Snip off the remaining webbing. Using the glue gun, glue the end of the webbing at the rear of wreath.
4. Making the ribbon.
As I am completely hopeless at tying ribbons, I used a bit of a cheats way of getting a nice finish. I took a length of the leftover webbing and made two loops on the left hand side, the back loop slightly bigger than the front one. Now do the same on the other side, using the remaining webbing. Take the leftover end of webbing and wrap around the wreath and centre of your "bow", until it is secure enough to glue at rear of wreath behind the bow.
| The finished "bow" |
Your wreath is now ready to hang!
I hope you liked my first tutorial? I very much enjoyed making the wreath and LOVED how the end result looks. Handmade and beautiful!!
Cheers,
Jodie
MPH xx
Monday, 5 December 2011
An online treat......
Hello all,
Yesterday I found a lovely new treat for you all..........a new online magazine, full of great ideas and some really cool DIY ideas too! Sounds right up my alley, I LOVE new projects to inspire me. Gingerbread house recipes always terrify me, but the one featured looks fairly simple.......but my cake decorating skills are hideous to say the least!! The magazine is called My Little Jedi......cute name. Filled with beautiful photography and gorgeous products too.
Suggestion for the afternoon..........grab a cuppa, sit in a sunny spot and click on the link below and browse to your heart's delight!!
I hope you enjoy!
Cheers,
Jodie
MPH xx
Yesterday I found a lovely new treat for you all..........a new online magazine, full of great ideas and some really cool DIY ideas too! Sounds right up my alley, I LOVE new projects to inspire me. Gingerbread house recipes always terrify me, but the one featured looks fairly simple.......but my cake decorating skills are hideous to say the least!! The magazine is called My Little Jedi......cute name. Filled with beautiful photography and gorgeous products too.
Suggestion for the afternoon..........grab a cuppa, sit in a sunny spot and click on the link below and browse to your heart's delight!!
![]() |
| View magazine HERE |
Cheers,
Jodie
MPH xx
Thursday, 24 November 2011
Home made room spray.......chemical free!
Hello there!
I don't know about you, but I am really aware of what I breathe in and put on my skin, hair, etc. Commercial room sprays and deodorisers make me shudder when I think what they may contain. Whilst searching the web last night, I stumbled across this simple recipe to make your own room spray! Yay, no more hideous chemicals floating around in the air! Plus......a lot cheaper than buying supermarket sprays, which can be quite expensive......
This recipe contains lavender and grapefruit essential oils, but you could use any of your favourite essential oils. You could use synthetic scented oils, but it is defeating the purpose and these are really not as nice as natural essential oils in my opinion. This homemade version is a lot safer to use around babies and the little ones in our lives.
The recipe is from the very useful and interesting blog: www.bestgreentips.com and the link for the room spray recipe is HERE.
Small spray bottles can be found at chemists, storage shops or sometimes $2 shops.
I hope you try and make your own.......these would make great gifts too, wrapped in some beautiful ribbon and placed in a handmade gift box!
Cheers,
Jodie
MPH xx
I don't know about you, but I am really aware of what I breathe in and put on my skin, hair, etc. Commercial room sprays and deodorisers make me shudder when I think what they may contain. Whilst searching the web last night, I stumbled across this simple recipe to make your own room spray! Yay, no more hideous chemicals floating around in the air! Plus......a lot cheaper than buying supermarket sprays, which can be quite expensive......
This recipe contains lavender and grapefruit essential oils, but you could use any of your favourite essential oils. You could use synthetic scented oils, but it is defeating the purpose and these are really not as nice as natural essential oils in my opinion. This homemade version is a lot safer to use around babies and the little ones in our lives.
The recipe is from the very useful and interesting blog: www.bestgreentips.com and the link for the room spray recipe is HERE.
Small spray bottles can be found at chemists, storage shops or sometimes $2 shops.
I hope you try and make your own.......these would make great gifts too, wrapped in some beautiful ribbon and placed in a handmade gift box!
Cheers,
Jodie
MPH xx
Thursday, 17 November 2011
Christmas bunting tutorial........
Hello to you all,
Last night I found an excellent tutorial for a Christmas bunting. It looks great (I would change the colours to my liking of course.........maybe some spotty fabrics?) and it is pretty easy to make. The shape for the stocking is also included to download, just print it out onto some card or paper to use for template.
Spotlight have some very nice Christmas fabric for sale either in fat quarters (50 x 50cm) or by the metre.
The fat quarter option is great if you would like a few different patterns, or by the metre if you want the stockings to be all the same pattern. Another option is to use plain fabric and decorate each stocking.
Felt for the back of each stocking can be found at Spotlight, Lincraft or any craft/sewing store or Sam's Warehouse in Dromana sells felt at quite a reasonable price.
The tutorial comes from this blog www.punkinpattern.blogspot.com and the link for the tutorial is HERE
I hope you have a go at creating this project!
Cheers,
Jodie
MPH xx
Christmas Bunting Tutorial!!
Last night I found an excellent tutorial for a Christmas bunting. It looks great (I would change the colours to my liking of course.........maybe some spotty fabrics?) and it is pretty easy to make. The shape for the stocking is also included to download, just print it out onto some card or paper to use for template.
| Christmas Bunting tutorial |
The fat quarter option is great if you would like a few different patterns, or by the metre if you want the stockings to be all the same pattern. Another option is to use plain fabric and decorate each stocking.
Felt for the back of each stocking can be found at Spotlight, Lincraft or any craft/sewing store or Sam's Warehouse in Dromana sells felt at quite a reasonable price.
The tutorial comes from this blog www.punkinpattern.blogspot.com and the link for the tutorial is HERE
I hope you have a go at creating this project!
Cheers,
Jodie
MPH xx
Thursday, 10 November 2011
Easy peasy Christmas Decoration tutorial
Hello,
OK don't be mad, I have held off until now, but that's it.......it is time to make Christmas stuff! I love Christmas and the whole decoration thing, so I thought this tutorial would be great for those of us who don't sew...........of course you can choose whatever fabric you like and change it up a bit. Get your kids involved, it is an excellent project for them......it does involve the use of a butter knife, so you may want to supervise?
It looks fairly simple, foam ball, rubber bands, permanent marker, fabric, glue and ricrac or twine.....you get the picture.
The tutorial is from the brilliantly named blog......."Crap I've Made".......love it!
The link for the tutorial is HERE.
I am curious to see what you all come up with?
Cheers,
Jodie
MPH xx
OK don't be mad, I have held off until now, but that's it.......it is time to make Christmas stuff! I love Christmas and the whole decoration thing, so I thought this tutorial would be great for those of us who don't sew...........of course you can choose whatever fabric you like and change it up a bit. Get your kids involved, it is an excellent project for them......it does involve the use of a butter knife, so you may want to supervise?
It looks fairly simple, foam ball, rubber bands, permanent marker, fabric, glue and ricrac or twine.....you get the picture.
The tutorial is from the brilliantly named blog......."Crap I've Made".......love it!
The link for the tutorial is HERE.
I am curious to see what you all come up with?
Cheers,
Jodie
MPH xx
Tuesday, 25 October 2011
Crafty girls get together.........
Good morning!
I hope everyone enjoyed a nice weekend, despite the absolutely bizarre weather!?! From raincoats and heaters one day, to air-con and ceiling fans the next, back to freezing again today........? I have had to light the wood fire first thing this morning, so nice to sit next to it and write my blog.
Ok, so on to some crafty news. Last night I held a handmade card making workshop at my house, my very first one!! Surprise surprise, I was super organised and had everything cut and ready for the girls to sit down and put their cards together. After a couple of teeny weeny hiccups in my initial demonstration.......(thanks Teena for the tips during the night), the girls got underway and worked brilliantly!
Three girls who attended, had never made their own cards before and just LOVED it. I had some of my usual stamping group girls come along also.......thanks to Danni for being an excellent assistant during my demonstration. On the agenda for the night was a Christmas card, using a couple of different techniques - embossing the background with a raised spotty pattern and also used stamps for decoration. Contrasting papers were used to give a great effect. One not-so-Christmassy person made the card in a birthday theme and it looked just as effective.
In addition to the card, the girls were set the task of creating a couple of gift tags. So easy to do and the tags turned out beautifully..........
Stamped on one side with a beautiful lacy pattern and the flip side with your "to, from", which in this case was a Christmas decoration, but could be left blank for handwriting on. Of course the colours of both projects were of my own taste, I love the simple earthy look. With so many colour options available, both projects could be changed to suit any occasion or taste.
All in all, we had a great night......with some yummy home made lemon slice from my lovely Mum, a few nibbles and lots of laughs.....(mostly directed at me!) plus the girls got to take home their gorgeous creations.
Cheers,
Jodie
MPH xx
I hope everyone enjoyed a nice weekend, despite the absolutely bizarre weather!?! From raincoats and heaters one day, to air-con and ceiling fans the next, back to freezing again today........? I have had to light the wood fire first thing this morning, so nice to sit next to it and write my blog.
Ok, so on to some crafty news. Last night I held a handmade card making workshop at my house, my very first one!! Surprise surprise, I was super organised and had everything cut and ready for the girls to sit down and put their cards together. After a couple of teeny weeny hiccups in my initial demonstration.......(thanks Teena for the tips during the night), the girls got underway and worked brilliantly!
Three girls who attended, had never made their own cards before and just LOVED it. I had some of my usual stamping group girls come along also.......thanks to Danni for being an excellent assistant during my demonstration. On the agenda for the night was a Christmas card, using a couple of different techniques - embossing the background with a raised spotty pattern and also used stamps for decoration. Contrasting papers were used to give a great effect. One not-so-Christmassy person made the card in a birthday theme and it looked just as effective.
In addition to the card, the girls were set the task of creating a couple of gift tags. So easy to do and the tags turned out beautifully..........
Stamped on one side with a beautiful lacy pattern and the flip side with your "to, from", which in this case was a Christmas decoration, but could be left blank for handwriting on. Of course the colours of both projects were of my own taste, I love the simple earthy look. With so many colour options available, both projects could be changed to suit any occasion or taste.
All in all, we had a great night......with some yummy home made lemon slice from my lovely Mum, a few nibbles and lots of laughs.....(mostly directed at me!) plus the girls got to take home their gorgeous creations.
Cheers,
Jodie
MPH xx
Thursday, 20 October 2011
Take better product photos now!
Hi everyone,
I am always trying to take the "Perfect" photo of my products..........usually they turn out to be OK, but this is not always the case. Sooo, I found this excellent tutorial online, which gives some great ideas on how to achieve better photos. It is done by Tresa Black from Fabulously Artsy. Tresa uses Picasa, which I am yet to play with..........but after reading this tutorial, now I am itching to give it a go! I love the quick and easy way to watermark the photo, which looks a lot simpler than how I have done it in the past using Photoshop .
So, here is the link......Taking better artwork photos.
I hope this helps with the photography of your handmade products!
Cheers,
MPH xx
I am always trying to take the "Perfect" photo of my products..........usually they turn out to be OK, but this is not always the case. Sooo, I found this excellent tutorial online, which gives some great ideas on how to achieve better photos. It is done by Tresa Black from Fabulously Artsy. Tresa uses Picasa, which I am yet to play with..........but after reading this tutorial, now I am itching to give it a go! I love the quick and easy way to watermark the photo, which looks a lot simpler than how I have done it in the past using Photoshop .
So, here is the link......Taking better artwork photos.
I hope this helps with the photography of your handmade products!
Cheers,
MPH xx
Thursday, 6 October 2011
The 20 minute shopping tote bag.......
Hello,
I had a late night browsing the wonderful world of craft tutorials...and have bags under my eyes this morning as a result....There are SO many out there and I was trying to find something easy peasy so everyone could have a go at making it.
And so.........here it is: The 20 Minute Tote tutorial from The Purl Bee. I thought the totes look fantastic, PLUS can also help stop the use of the dreaded plastic bag. I love a good Eco-friendly project! If you are looking for other tutorials, The Purl Bee is jam packed full of them.
So if you have a spare 20 minutes or thereabouts and some groovy fabric........I would love to see what you come up with. I hope I get some pictures emailed to morningtonpeninsulahandmade@gmail.com so I can put them into a blog post.
Christmas is coming and these would make an excellent prezzie for ecofriendly-challenged friends and family :)
Cheers,
MPH xx
I had a late night browsing the wonderful world of craft tutorials...and have bags under my eyes this morning as a result....There are SO many out there and I was trying to find something easy peasy so everyone could have a go at making it.
And so.........here it is: The 20 Minute Tote tutorial from The Purl Bee. I thought the totes look fantastic, PLUS can also help stop the use of the dreaded plastic bag. I love a good Eco-friendly project! If you are looking for other tutorials, The Purl Bee is jam packed full of them.
![]() |
| 20 Minute Tote Bag |
So if you have a spare 20 minutes or thereabouts and some groovy fabric........I would love to see what you come up with. I hope I get some pictures emailed to morningtonpeninsulahandmade@gmail.com so I can put them into a blog post.
Christmas is coming and these would make an excellent prezzie for ecofriendly-challenged friends and family :)
Cheers,
MPH xx
Thursday, 22 September 2011
Make your own labels
Hi!
To my fellow handmaders...
Here is something I have been trying to get my head around since starting my own handmade business..........Labels!
What sort will I get? How much are they? etc, etc, etc. I have now started making my own fabric labels and printing my own business card tags, which is much more cost effective than getting them made by someone else. It just takes a bit of time.....so if you can turn your hand to doing up a simple design on your computer......you are on your way! I use Microsoft Publisher for basic stuff and Photoshop for more complicated work.
Now the business cards are fairly basic, do the design and print them.
Fabric labels??? A bit more tricky I think!! But, I was lucky enough to stumble across a brilliant tutorial by - BIRCHseed - printed by hand -
BIRCHseed have put up an easy to follow tutorial HERE
It is almost exactly how I do my own labels, except I print mine onto white Bias tape, so the top and bottom edges are neat and you just fold the ends under and sew them on! Simple!
While you are over at BIRCHseed, take a look at the beautiful fabric products they make! (They are not based on the Mornington Peninsula, but I thought the tutorial would benefit anyone looking at label making)
I hope you like the idea of some tutorials, there will be more to come on each Thursday!
Cheers,
MPH xx
To my fellow handmaders...
Here is something I have been trying to get my head around since starting my own handmade business..........Labels!
What sort will I get? How much are they? etc, etc, etc. I have now started making my own fabric labels and printing my own business card tags, which is much more cost effective than getting them made by someone else. It just takes a bit of time.....so if you can turn your hand to doing up a simple design on your computer......you are on your way! I use Microsoft Publisher for basic stuff and Photoshop for more complicated work.
Now the business cards are fairly basic, do the design and print them.
Fabric labels??? A bit more tricky I think!! But, I was lucky enough to stumble across a brilliant tutorial by - BIRCHseed - printed by hand -
BIRCHseed have put up an easy to follow tutorial HERE
It is almost exactly how I do my own labels, except I print mine onto white Bias tape, so the top and bottom edges are neat and you just fold the ends under and sew them on! Simple!
While you are over at BIRCHseed, take a look at the beautiful fabric products they make! (They are not based on the Mornington Peninsula, but I thought the tutorial would benefit anyone looking at label making)
I hope you like the idea of some tutorials, there will be more to come on each Thursday!
Cheers,
MPH xx
Subscribe to:
Posts (Atom)